
Wedding season is here! Whether your a bride, bridesmaid, guest, have a special event, or just want to have an easy go-to updo that you can do yourself, this tutorial is for you! This updo is my go-to for special events and occasions. The best part is that it looks like it's so hard to do, but it's actually quite simple!
First, I prepped my hair! I washed my hair before doing this look. Then, before blow-drying my hair I used my favorite Colour Fanatic spray, Big Sexy Hair: Root Pump at my roots, and finished off with Oribe Featherbalm Weightless Styler throughout my ends. (**Side note: I usually let my hair air dry, but didn't have time to let it do that, which is why I used a blow dryer.)


Once the hair is prepped and dried, next is the teasing! Teasing the hair will help give you a good foundation and be easier to create a base when using bobby pins to form the actual updo. Don't be afraid to tease a bit more than usual because when you're "molding" the hair some of the tease will fall out as you work with it.
(If you don't know where to begin for this step or just need a little extra help, check out this post. )

After the hair has a nice tease, next comes the curling. I curl my hair in sections starting from the bottom, upward. I used a smaller size iron (3/4 inch) for more texture. Feel free to use whatever size iron works best for you. You could even use a wand or a straightener for this part as well.
Use hairspray after each section before moving onto the next. Do this until your whole head is curled. This part takes me the longest, but after this the rest takes me 5-10 minutes!
CURLING TIP:
ALWAYS start curling your hair closest to the root then work your ends in. (See picture above.) This helps get more volume at the top and won't leave your curls to fall flat.

And now you look like Shirley Temple! Just kidding! Kind of.
Once my whole head is finished, I give it one more good spray.
STYLING TIP:
Don't brush your curls out, let them set! Also, make your curls a little tighter than usual because as you pin your hair up and even throughout the day the curls will soften on their own. For longer hair that make not hold as tight of a curl, I recommend doing a roller set!


Now, we're ready to start pinning the hair back! Using your fingers, section out your hair on both sides near the ears and pin just the back section of your hair into a "half-up, half-down" look. If you teased your hair well enough, you shouldn't really have to grab too much hair for this. Just "skim" off of the top part of your hair and pinch it together to pin. Let all the teasing you did in the first step make your life a little easier for this one!
UPDO TIP:
Anytime I do an updo on myself or anyone else, I usually always leave the sides out because once the back is finished, it's easier to pin the sides into the updo and cover up any elastics, bobby pins, etc. that may have been used!


Next, you're going to pull the hair up into a messy bun. All you're going to do is gather your hair up into your hands and using your mirror judge and see if you like how the front is laying with everything pulled back. Once you like how it looked, take your hair tie and create a messy (but secured) bun. (** Don't worry if some pieces are falling down, we'll fix those next!)

Once your messy bun is secured, slightly pull it apart for a fuller effect (unless you like the fullness of it already) and using some bobby pins, pin any random pieces up that you think look out of place. The nice part about creating all the texture with the curls is that usually no matter what you pin, the updo will still look effortlessly put together.
PINNING TIP:
Whenever you're pinning pieces of hair, look and feel as to where your fingers are. Where your fingers are holding a piece of hair is exactly where you want your bobby pins to be placed in order to effectively secure your hair in that spot.

After you have the back secure and you like how it looks, move to the side pieces and pin any of those back that you would like. (**Notice how I'm placing my bobby pin right where my fingers are holding!)

After the sides are pinned to your liking, you can then soften out the curls a bit around your face and pull down and "wispies" that you would like to frame your face as well.


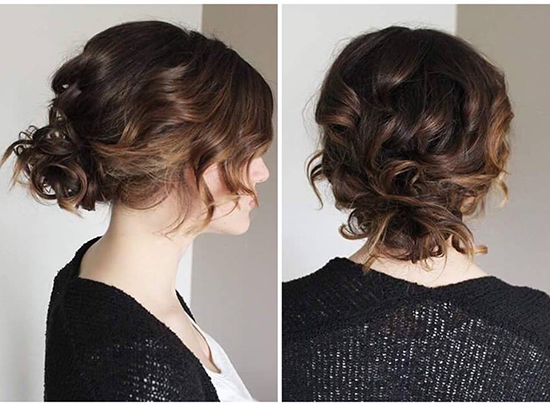
And with that... your look is complete! It may seem like a lot of steps, but once you do it, you'll quickly realize it's not. I just wanted to help break them down and give you any tips that I could.
I chose to curl my hair for this look to show you how "formal" it can look, but you can also adapt it with straight hair or even just going with your natural texture.
If you recreate this look, tag me so I can see your looks! And as always, if you have any questions or recommendations for future tutorials, feel free to reach out.
Happy styling!


No comments:
Post a Comment